Installation & Getting Started
Run RobOS instantly on your existing macOS, Linux, or Windows WSL machine via Docker or standalone CLI/apps, or deploy the native developer desktop suite and optional appliance OS.
Table of contents
- Option 1: Instant Universal Quickstart & Agent Sandbox (macOS, Linux, Windows WSL)
- Option 2: Full Native Developer Suite (Ubuntu / GNOME Desktop)
- Option 3 (Optional Power-User Appliance): Dedicated RobOS OS Distro & QEMU VM
- Cross-Platform Desktop Setup: macOS & Windows
- First-Run Onboarding & Organization Setup
- Testing & Verifying Applications
- Next Steps
Option 1: Instant Universal Quickstart & Agent Sandbox (macOS, Linux, Windows WSL)
The fastest way to experience RobOS without modifying your operating system. RobOS is engineered to run seamlessly alongside your existing IDE (VS Code, IntelliJ IDEA) and terminal workflows on macOS, Linux, or Windows (WSL2).
1. Prerequisites
- Node.js 20+ and npm
- Git
- Docker (optional, recommended for headless virtual framebuffer & video proof-of-work)
2. Quick Setup & Headless Agent Verification
# 1. Clone the RobOS repository
git clone https://github.com/nddipiazza/robos.git
cd robos

# 2. Run containerized headless verification & video proof-of-work
./scripts/e2e-container.sh
3. Launch Standalone Tools
You can launch any RobOS application individually without installing the desktop shell:
# Install package dependencies
npm install

# Launch Agent Code Review Platform
electron packages/pr-review

# Launch System Topology & C4 Architecture Studio
electron packages/topology-manager

# Launch Dev Central daily dashboard
electron packages/dev-central

# Launch Bruno REST API Client
electron packages/rest-client

# Launch Relational DB Manager (PostgreSQL, MySQL)
electron packages/db-manager
4. Use Knowledge Graph in Existing Repositories
Simply drop the .robos/ directory into your project root to immediately enable declarative architecture modeling, TypeSpec schemas, W3C SHACL shape validation, and pre-code blast-radius diffing with any AI agent (Claude Code, Gemini, Copilot, Antigravity).
Option 2: Full Native Developer Suite (Ubuntu / GNOME Desktop)
If you run an Ubuntu Linux (22.04 LTS, 24.04 LTS, or 26.04) workstation with the GNOME desktop environment, you can install the complete RobOS desktop suite, app launchers, system tray daemons, and shared libraries directly alongside your existing desktop:
1. One-Line Desktop Installation
# Clone the RobOS repository
git clone https://github.com/nddipiazza/robos.git
cd robos

# Audit & install dev machine dependencies
node scripts/install-dev-deps.js

# Install all 30+ apps, .desktop entries, and shared libraries to /usr/local/share/robos/
sudo bash packages/desktop-shell/install.sh
2. Launching Applications from Desktop Panel
All RobOS applications become accessible directly from the RobOS App Launcher in your desktop dock and top panel, or executable from the Tilix/bash terminal.
Option 3 (Optional Power-User Appliance): Dedicated RobOS OS Distro & QEMU VM
For regulated environments, hardware air-gapping, or developers who want a dedicated appliance workstation, RobOS provides a fully provisioned, bootable Ubuntu 26.04 LTS developer OS image and local QEMU/KVM virtual machine.
A. Bare Metal Deployment (Flash via Rufus / Etcher / dd)
- Download the latest
robos-v0.1.0.isofrom GitHub Releases. - Write to a USB flash drive:
- Windows: Use Rufus (Select GPT partition scheme and UEFI target).
- macOS / Linux: Use balenaEtcher or standard
dd:sudo dd if=robos-v0.1.0.iso of=/dev/sdX bs=4M status=progress conv=fsync
- Insert the USB drive into your PC, boot into UEFI, and let cloud-init automatically provision the environment.
- Default credentials:
robos/robos.
B. Virtual Machine Deployment (QEMU / KVM)
# Build the sparse disk image + cloud-init ISO
infra/desktop/build.sh

# Run VM (16GB RAM, all host CPUs, SSH on port 2224, VNC on port 5910)
infra/desktop/run.sh

# Connect via SSH
ssh -p 2224 robos@localhost
Cross-Platform Desktop Setup: macOS & Windows
RobOS applications are built using pure Electron and vanilla JavaScript with zero framework overhead, making them inherently cross-platform and runnable across macOS, Windows, and Linux.
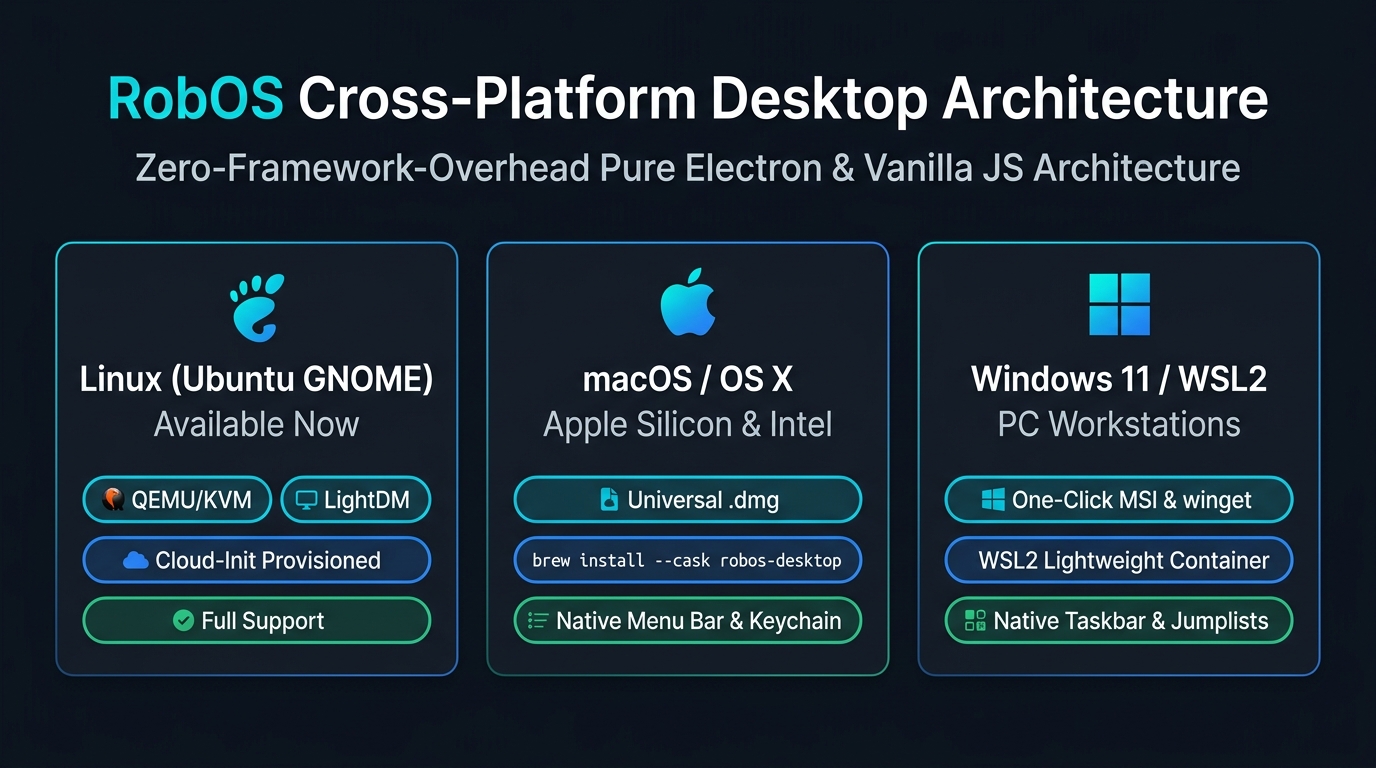
🍎 macOS Setup (Apple Silicon M1–M4 & Intel)
RobOS runs natively on macOS with full support for Apple Silicon and Intel architectures.
1. Prerequisites (via Homebrew)
brew install node git
# Optional: Docker Desktop or OrbStack for containerized headless video proof-of-work
brew install --cask docker
2. Clone & Install
git clone https://github.com/nddipiazza/robos.git
cd robos
npm install
3. Launch Standalone Applications
Launch any RobOS application directly from your terminal:
# Launch Agent Code Review Platform & IDE Bridge
npx electron packages/pr-review

# Launch System Topology & C4 Architecture Studio
npx electron packages/topology-manager

# Launch Dev Central daily dashboard
npx electron packages/dev-central

# Launch Relational DB Manager (PostgreSQL, MySQL)
npx electron packages/db-manager

# Launch Bruno REST API Client
npx electron packages/rest-client
4. Run Headless Proof-of-Work in Docker
# Run containerized headless E2E verification & Piper TTS video proof-of-work
./scripts/e2e-container.sh
🪟 Windows 11 & 10 Setup (WSL2 & Native PowerShell)
RobOS supports Windows both inside WSL2 (with WSLg hardware-accelerated GUI streaming) and natively via PowerShell.
Method A: WSL2 with WSLg (Recommended)
WSL2 provides the ideal environment for RobOS on Windows because it supports in-memory tmpfs agent sandboxes, virtual X11 framebuffers, and native Windows 11 window integration:
# 1. Inside your WSL2 Ubuntu terminal, install Node.js and Git:
sudo apt update && sudo apt install -y nodejs npm git

# 2. Clone the repository and install dependencies:
git clone https://github.com/nddipiazza/robos.git
cd robos
npm install

# 3. Launch applications (opens directly as native Windows 11 windows via WSLg):
npx electron packages/pr-review
npx electron packages/topology-manager
npx electron packages/dev-central

# 4. Run containerized headless verification & video proof-of-work:
./scripts/e2e-container.sh
Method B: Native Windows (PowerShell)
You can also run RobOS developer tools directly in Windows PowerShell:
# 1. Install Node.js LTS and Git (if not already installed)
winget install OpenJS.NodeJS.LTS
winget install Git.Git

# 2. Clone the repository and install dependencies:
git clone https://github.com/nddipiazza/robos.git
cd robos
npm install

# 3. Launch applications directly:
npx electron packages\pr-review
npx electron packages\topology-manager
npx electron packages\dev-central
npx electron packages\db-manager
First-Run Onboarding & Organization Setup
When you first launch RobOS or log into the desktop, you can onboard your organization or bootstrap a brand-new tenant:
🏢 Organization Setup Paths
- Existing Company Setup — For established organizations with existing IdPs: configure automated SCIM/LDAP directory sync (Okta, Azure AD / Microsoft Entra, Google Workspace), GitHub team mapping, and Team Topologies (
.robos/teams.yaml). - New Company Setup — For greenfield startups and new ventures: provision root administrator credentials, initialize VCS organizations, scaffold foundational squads, and configure AI provider keys.
🛠️ Developer Application Wizards
- Develop a New App — Launch the RobOS App Wizard to scaffold a brand-new application across 9 multi-app archetypes (
DesktopApp,FrontEndApp,PCGame,MobileGame,Microservice,ConsoleApp,MobileApp,DataPipeline,Library) with API contract specifications and runnabledev-setup.sh. - Import Existing Apps — Use the App Wizard’s import engine to deeply inspect existing brownfield repositories, auto-detect runtime frameworks, synthesize Backstage
catalog-info.yaml, and link into the Knowledge Graph.
Testing & Verifying Applications
Run the containerized headless test suite or local scenario walkers:
# Run full automated test suite inside Docker container with Xvfb
./scripts/e2e-container.sh

# Run unit & scenario tests
npm --prefix packages/robos-test test

# Run developer tools test suite
xvfb-run -a node --test packages/robos-test/tests/developer-tools/developer-tools-suite.test.js

# Run full end-to-end topology & kubernetes lifecycle test
xvfb-run -a node --test packages/robos-test/tests/e2e/topology-db-kube-lifecycle.test.js
Next Steps
- Existing Company Setup — Connect enterprise directory sync (Okta, Azure AD, OpenLDAP) and map Team Topologies.
- New Company Setup — Bootstrap a new startup, root administrator, and foundational squads.
- Develop a New App — Scaffold a new application across 9 archetypes with API contracts and Backstage catalog.
- Import Existing Apps — Ingest existing brownfield repositories with automated tech stack detection.
- RobOS Skills — Master cross-agent AI skills (Claude, Codex, Antigravity, Copilot, Gemini) and 74+ shell macros.
- App Development Flow — Learn the progressive flow of RobOS apps used to build an application.
- AI Agent Review-Based Development — Learn the plan-code-review-verify workflow.
- Master Walkthroughs — View recorded video walkthroughs and test proof-of-work.
- System Architecture — Explore the 8-pillar SDLC architecture and Knowledge Graph.
- App Suite Catalog — Explore all 30+ applications.
- 💡 Feature Ideas Store on GitHub — Explore raw ideas, structured specs, and community feature requests.