

Guide · Smart Home & Voice › RobOS Home Speaker (packages/home-speaker)
Home Assistant Voice (NC-VK-9727) Two-Way Intercom
RobOS Home Speaker features first-class support for the Nabu Casa Home Assistant Voice Preview Edition (NC-VK-9727). Speak announcements out loud with Kokoro neural TTS, ask a question from your workstation or coding agent, and have the speaker automatically open its dual-microphone array to record and transcribe your spoken answer locally with Whisper—without needing a wake word, button press, or cloud server.
- Live Video DemoHands-free voice approval ("Is it okay to push to main?")
- ArchitectureESPHome TCP
:6053,start_conversation=true& Whisper STT - Incoming Listen ModeAuto-record, wake word, local transcription & auto-reply
- Add Speaker WizardBluetooth Wi-Fi setup (Improv BLE) & plain-English cards
- Protocol ReferenceEntity keys, protobuf frame IDs & CLI commands
1. Live Video Demo: Hands-Free Voice Approval
In this live demo, RobOS asks out loud on the Home Assistant Voice (NC-VK-9727): "Is it okay to push to main?". The instant the question finishes playing, the speaker automatically turns on its microphone (no "Okay Nabu" wake word and no button press needed), hears the user answer "Yes it is.", transcribes it locally with Whisper, and confirms out loud: "Got it! You said yes. Pushing to main is approved."
2. Two-Way Voice Architecture
RobOS Home Speaker (packages/home-speaker, debug port :19200) talks directly to the Home Assistant Voice Preview Edition (NC-VK-9727) over your local Wi-Fi network on TCP port :6053 using the native ESPHome protobuf wire protocol (packages/home-speaker/lib/esphome-voice-service.js).
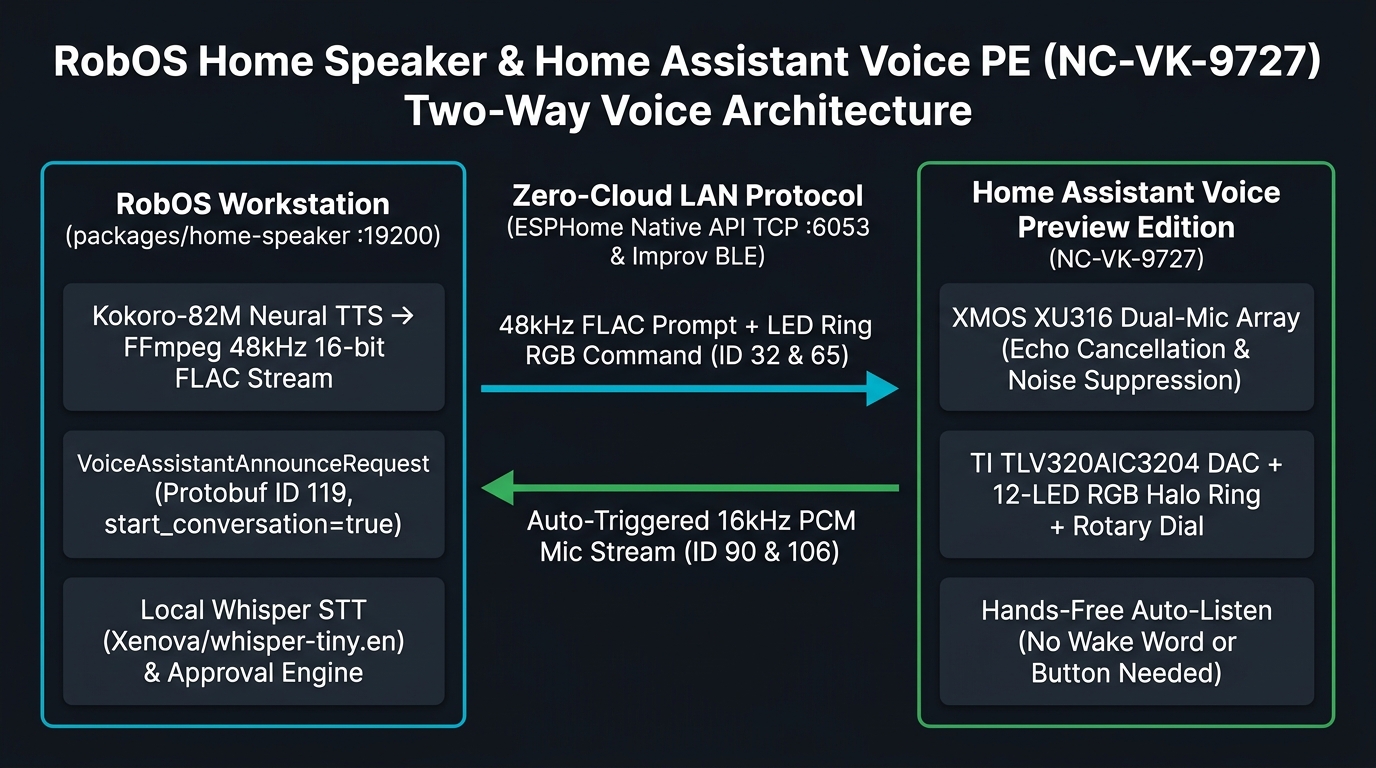
NC-VK-9727) over TCP :6053.
flowchart LR
  subgraph WORKSTATION["RobOS Workstation (packages/home-speaker :19200)"]
    TTS["Kokoro-82M Neural TTS
FFmpeg 48kHz 16-bit FLAC Transcoder"]
    ANNOUNCE["EspHomeVoiceService
VoiceAssistantAnnounceRequest (ID 119)
start_conversation = true (field 4)"]
    STT["Local Whisper ASR
(Xenova/whisper-tiny.en)
550ms Echo Guard + RMS VAD"]
    TTS --> ANNOUNCE
  end

  subgraph LAN["Zero-Cloud Local Network (TCP :6053 & Improv BLE)"]
    OUT["48kHz FLAC Stream + LED Ring RGB (ID 32 & 65)"]
    IN["Auto-Triggered 16kHz PCM Mic Stream (ID 90 & 106)"]
  end

  subgraph DEVICE["Home Assistant Voice PE (NC-VK-9727)"]
    DAC["TI TLV320AIC3204 DAC
Speaker + 12-LED RGB Halo Ring"]
    XMOS["XMOS XU316 Dual-Mic Array
Echo Cancellation & Noise Suppression"]
  end

  ANNOUNCE --> OUT --> DAC
  DAC -. "AnnounceFinished (ID 120) -> Auto-Start Mic" .-> XMOS
  XMOS --> IN --> STT
  STT -- "Spoken Confirmation Reply" --> TTS
3. Incoming from Speaker (Listen Mode) & Hands-Free Auto-Recording
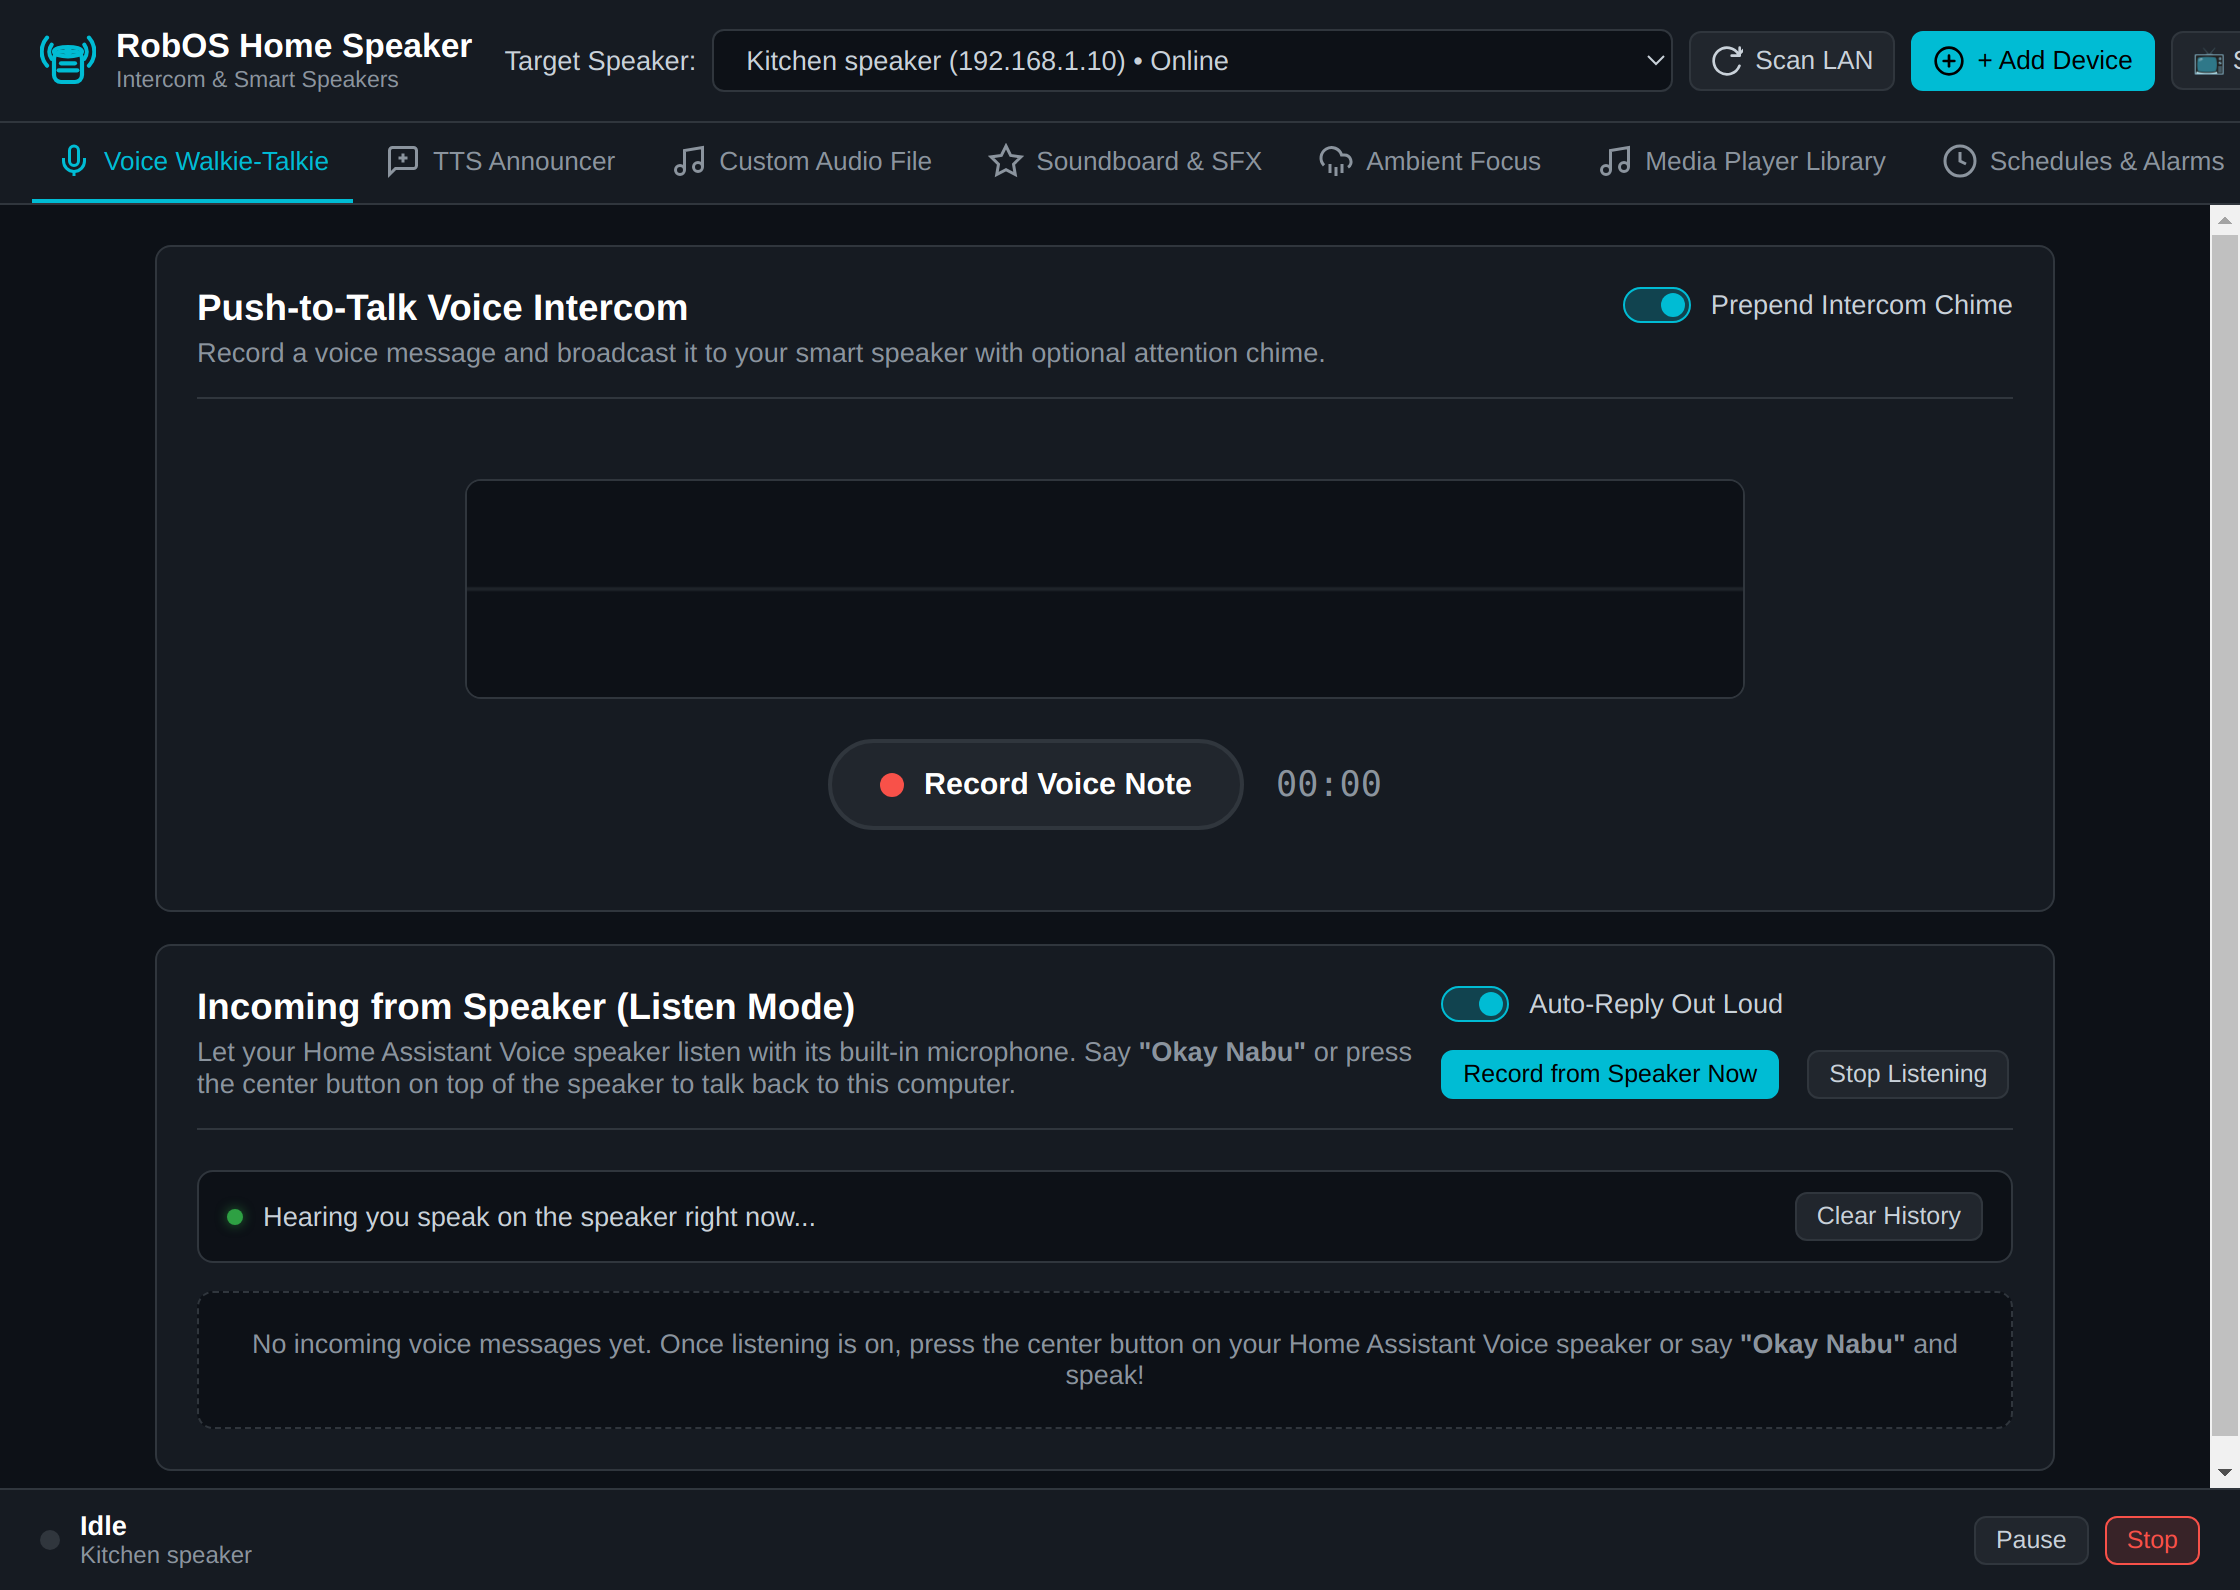
- Hands-Free Question & Auto-Listen (
start_conversation = true): By setting field4(start_conversation = true) onVoiceAssistantAnnounceRequest(msgType 119), the speaker plays the question and automatically transitions into microphone capture the moment playback ends—no wake word and no button press needed. - 550 ms Acoustic Echo Guard: When the microphone opens immediately after TTS playback,
EspHomeVoiceServicediscards the first 550 ms of room reverberation so the speaker never mistakes its own tail echo for your voice. - Record from Speaker Now: Click Record from Speaker Now in the UI to play a brief chime on the speaker and open its microphone immediately from your desk.
- Wake Word & Center Button: In background Listen Mode, you can also say "Okay Nabu" or press the center button on top of the speaker at any time to send a voice note to your computer.
4. Add Smart Speaker Wizard
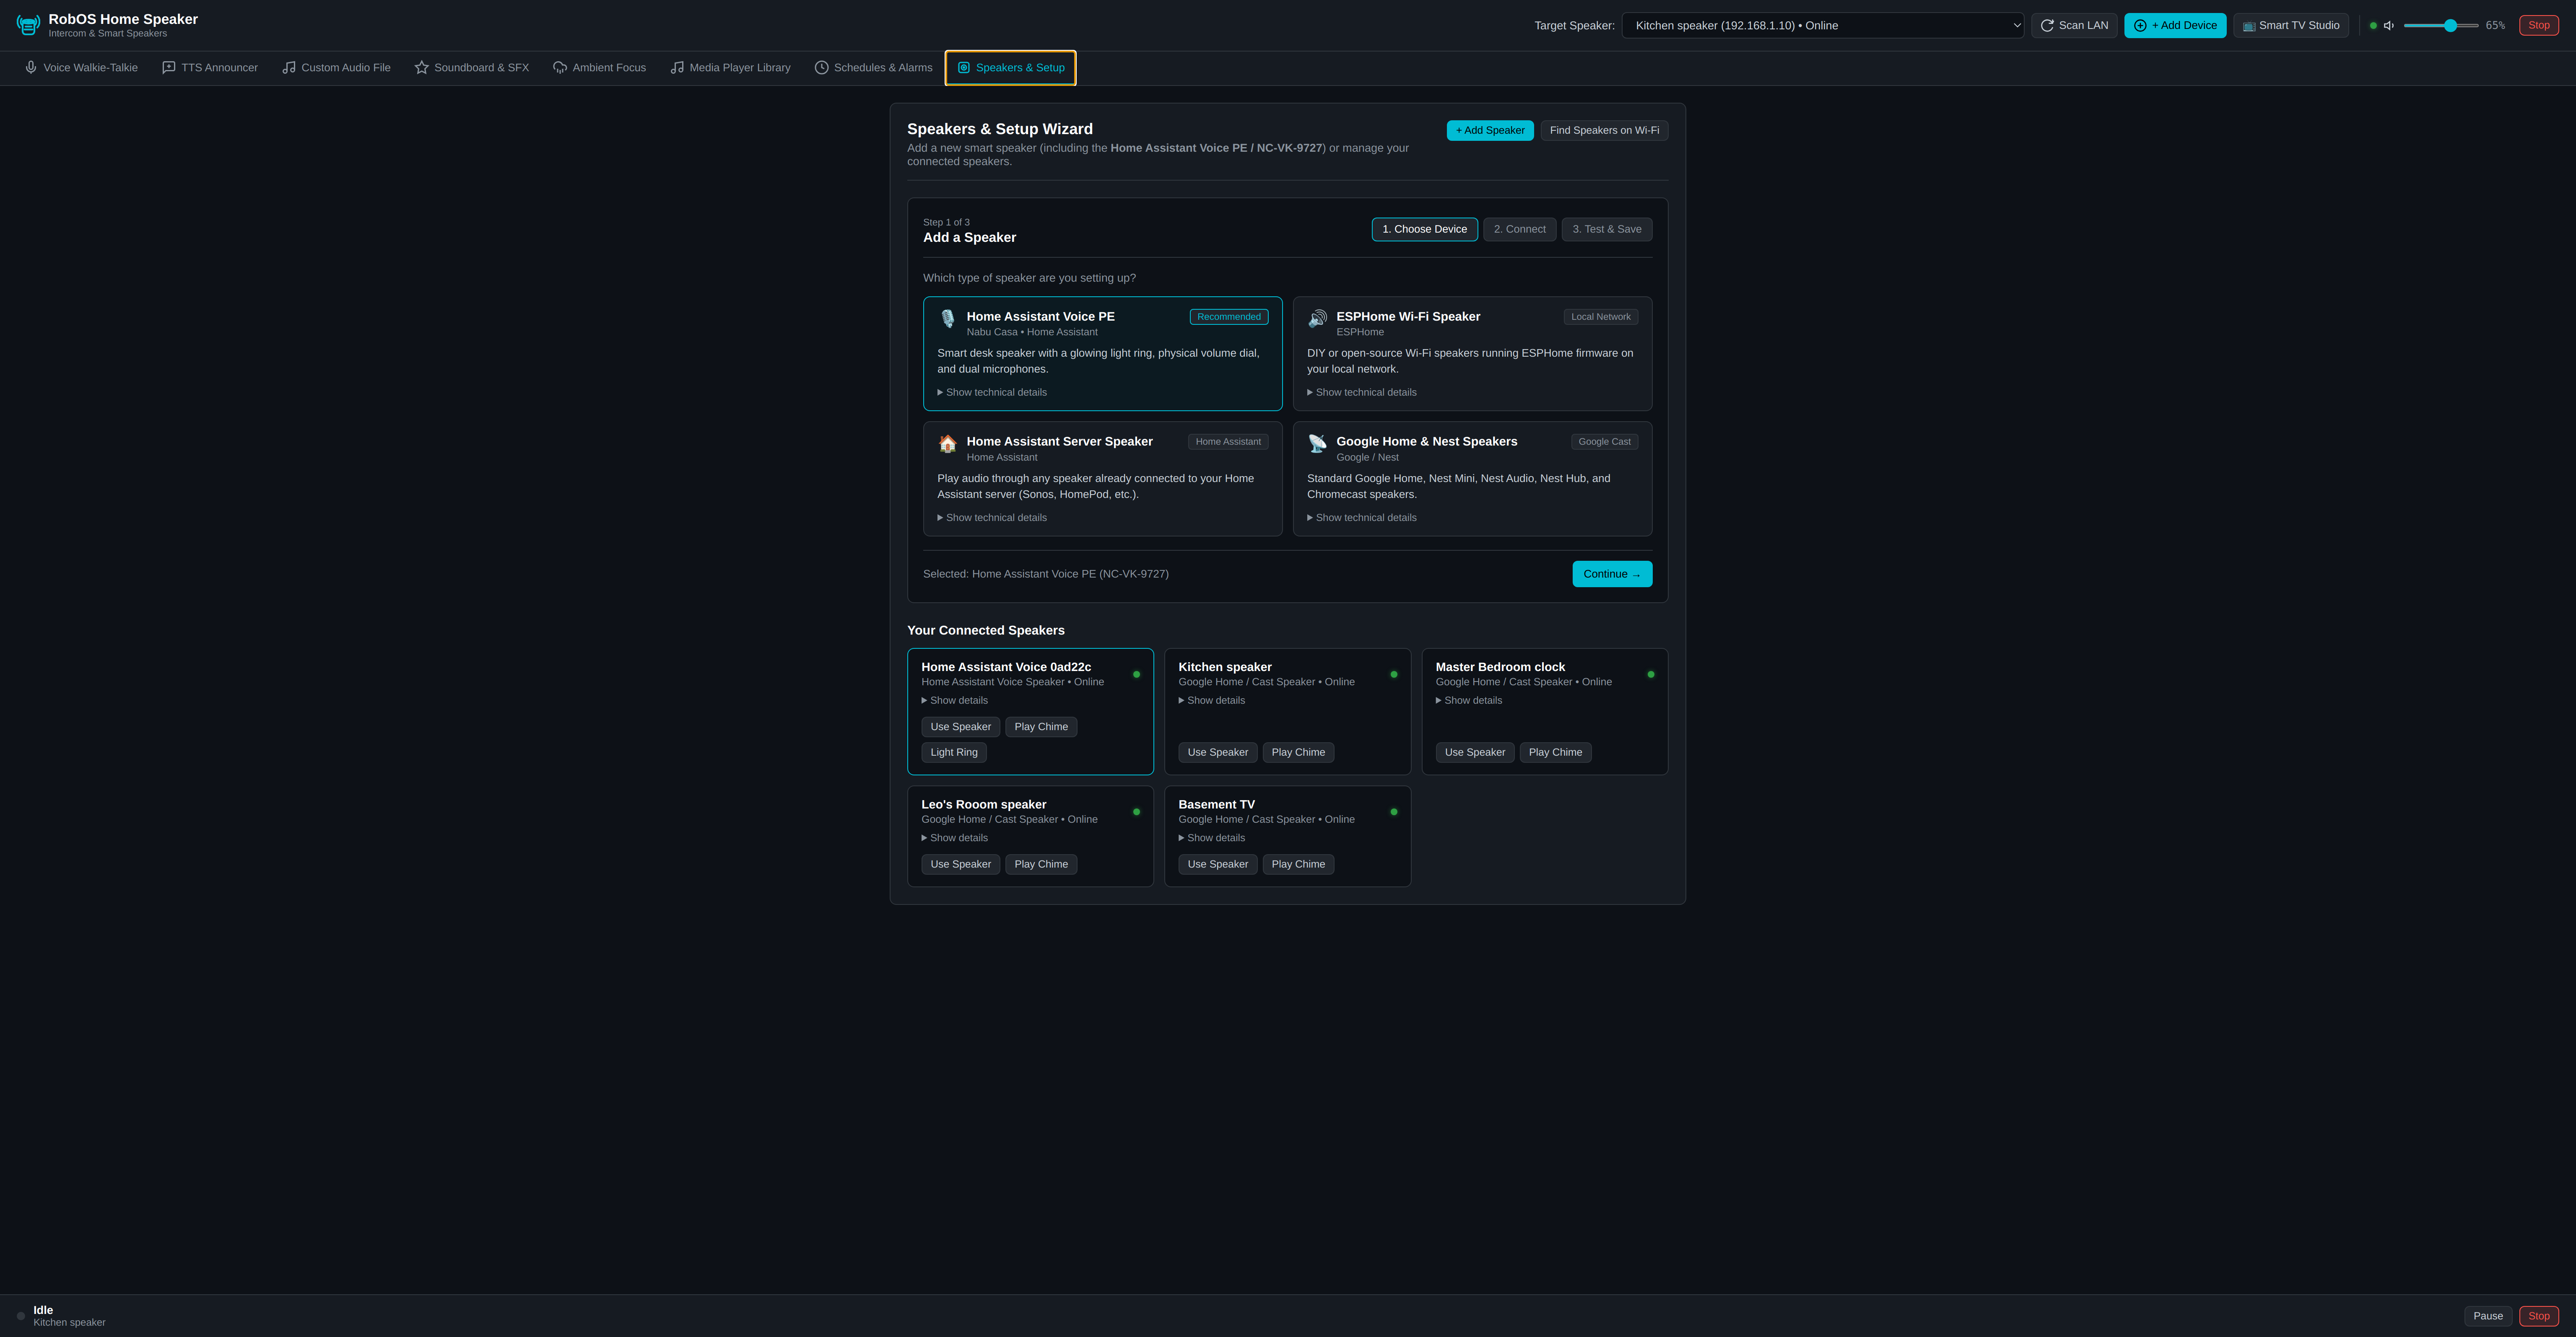
- Open RobOS Home Speaker and switch to the Speakers & Setup tab (or click + Add Speaker in the top bar).
- Select Home Assistant Voice Speaker (#1 in the catalog). Technical specifications stay tucked neatly inside collapsible
▸ Show technical detailssections. - If your speaker is brand new, expand the Bluetooth Wi-Fi setup section, click Scan Bluetooth, enter your 2.4 GHz Wi-Fi credentials, and click Send Wi-Fi to Speaker.
- Test the 12-LED RGB light ring, 48 kHz FLAC chime, and Kokoro neural greeting before saving.
5. Hardware Entities & Protocol Reference
| Entity / Message | Key / Protobuf ID | Purpose |
|---|---|---|
media_player | Key 2232357057 (msgType 65) | Hardware 48 kHz 16-bit FLAC announcement & media playback pipeline |
led_ring | Key 1459351809 (msgType 32) | 12-LED RGB Halo Ring control (LightCommandRequest) |
button_press | Key 2698747613 | Physical center button press events |
SubscribeVoiceAssistantRequest | msgType 89 | Subscribes RobOS to receive 16 kHz microphone audio over TCP :6053 |
VoiceAssistantRequest | msgType 90 | Sent by speaker when microphone capture begins (start = true) |
VoiceAssistantAudio | msgType 106 | 16 kHz 16-bit mono PCM audio frames from the XMOS XU316 dual-mic array |
VoiceAssistantAnnounceRequest | msgType 119 | Plays media_id (field 1) and with start_conversation = true (field 4) automatically starts recording |